If you want your website to be successful, it is important to know what your customers want from your website. The best way to do this is by analyzing the access. Google Analytics can completely do this. By analyzing statistics, you can plan and create better content for your readers. This tutorial will show you how to register and insert the Google Analytics code into your WordPress website.

Why do you need to add the Google Analytics code into WordPress?
It will be easy if you know what users want from you, your website, and your service, right? There is only one way to get visitors to spend more time on your website than to give them what they need. This is exactly what Google Analytics can do and it’s free! Here are some reasons why we recommend inserting the Google Analytics code into WordPress and realize why every WordPress blog has it:
- Helps you determine user behavior. Yes, you can track visitors with your Google Analytics. You can easily see which pages get the most views, which pages have the highest performance, as well as determine which pages leave your visitors as soon as they are viewed and more. It can also help you optimize the website more. If a blog post gains more views than usual, you can write more about the same topic to attract more visitors.
- Helps you analyze high access times. You can easily determine which hours reach the highest traffic. If most users are active on a dark night, obviously for more views, you should choose when the post is published at night.
- Help you discover the most important information. Google Analytics can also provide the smallest information – from the geographic location of any user to their language, the browser they use, the resolution. And so, help you understand your Audience more.
While there are many other web analytics tools you can use, Google Analytics offers more exclusive features. Take a quick look at some of its features:
- Generate customer reports easily. The best way to analyze user behavior is to rely on facts and metrics. This can be easily done by creating reports with an easy-to-understand interface. You can add some parameters and metrics to create a quality report.
- Create Custom Alerts. This is a great feature of Google Analytics that you can send an arbitrary text or email message whenever there is a sudden increase or decrease in the bounce rate. So you do not have to pay close attention to the dashboard to see important changes.
- Built-in search console. Keeping an eye on the statistics of SEO is of paramount importance. Search Console is a tool that can provide information related to search optimization. Integrating Search Console into Google Analytics will make it easier for you to access information and quickly analyze it.
Only some of these Google Analytics features have helped you manage the whole process of the WordPress website with ease!
Before you start, you need to prepare:
- You need to go to WordPress Admin DashBoard.
Step 1 – Create a Google Analytics account
The first thing you need to do is create a Google Analytics account and get the tracking code. The steps below will show you how to sign up for Google Analytics:
- Get started by visiting the Google Analytics homepage. Click the Sign In button, located at the top of the page and select Google Analytics.
- You will be redirected to the Login page. Enter your Google email address and click the Next button. If you do not have a Google account, create one by pressing the Create Account button.
- On the next page, enter your password and click the Sign In button.
- Press Sign Up button to continue.
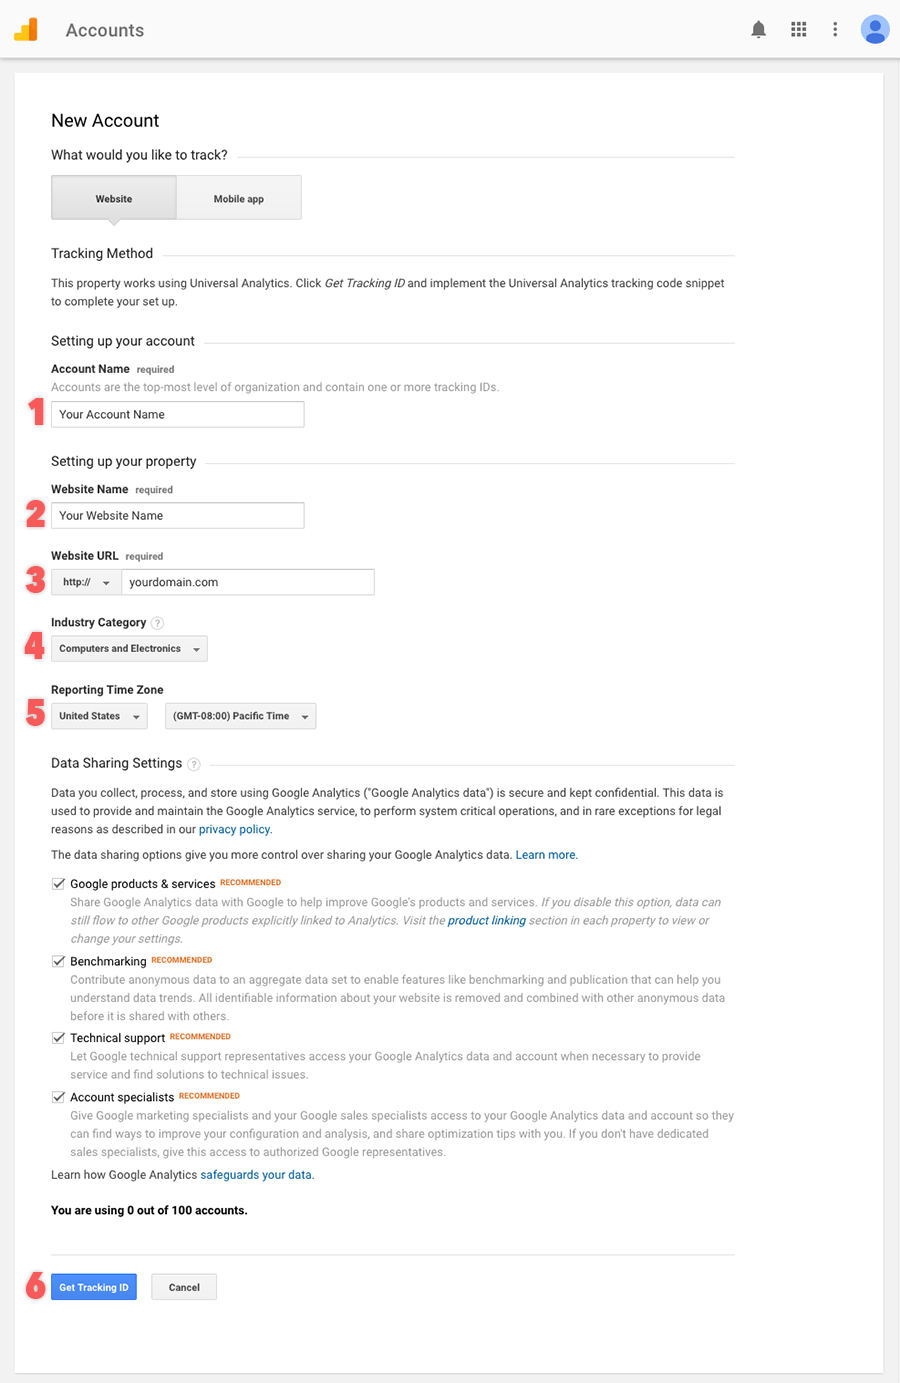
- To create a new account, you must fill in the following information:
- Account Name.
- Website Name.
- Website URL.
- Industry Category.
- Reporting Time Zone.

Fill out all the required data and hit the Get Tracking ID button ( 6 ). On the next page, you will be asked to approve the Terms of Service, click I Accept here.
That’s it! You have successfully created a Google Analytics account. On the next page, you’ll find the Google Analytics Universal tracking code:
![]()
Step 2 – Insert the Google Analytics code into WordPress
There are many ways to insert Google Analytics code into WordPress: use the plugin or you can insert script tracking directly into header.php
Use the Plugin
If you are unfamiliar with the WordPress and PHP file structure, we recommend using the Plugin method. One of the best plugins to insert google analytics code into WordPress is Analytics Code Integration. This plugin will insert Universal Analytics tracking code automatically – you just enter the tracking ID.
The following steps will guide you how to install the plugin and insert Google Analytics tracking ID:
- Log in to the WordPress Dashboard and install any the Google Analytics Plugin.
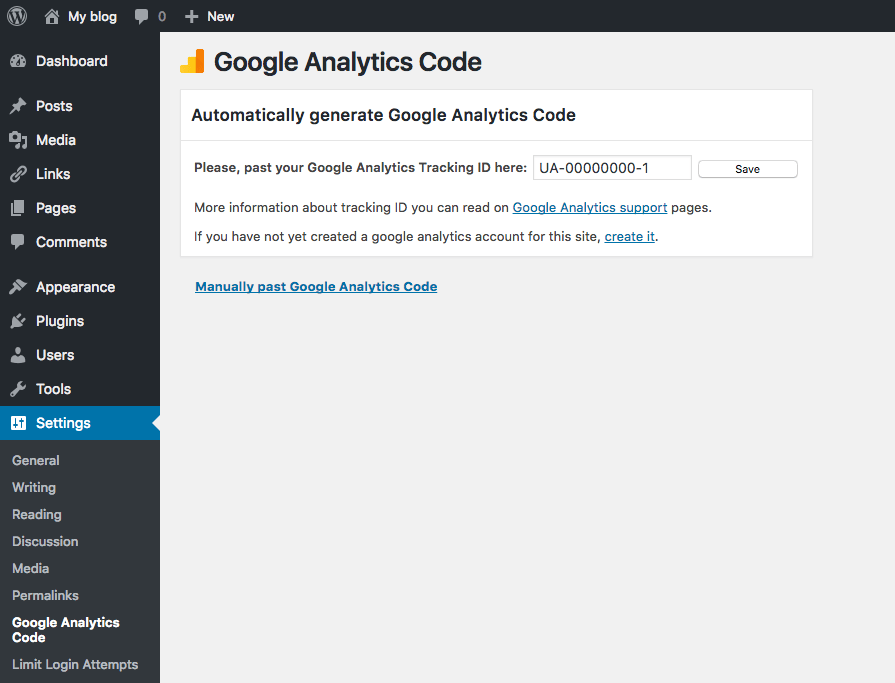
- Once the installation process is complete, navigate to the Settings section and click on the Google Analytics Code.
- Paste the code there and click the Save button.
- That’s it, the tracking code was successfully installed on the WordPress blog.

Please note that it may take up to 12-24 hours for Google Analytics to update and start showing first results. Then, visitor metrics will be provided in the Google Analytics tab.
Insert code into header.php
As mentioned, there are many ways to add Google Analytics code to a WordPress blog. For example, the code can be inserted into the theme.php file of the website theme:
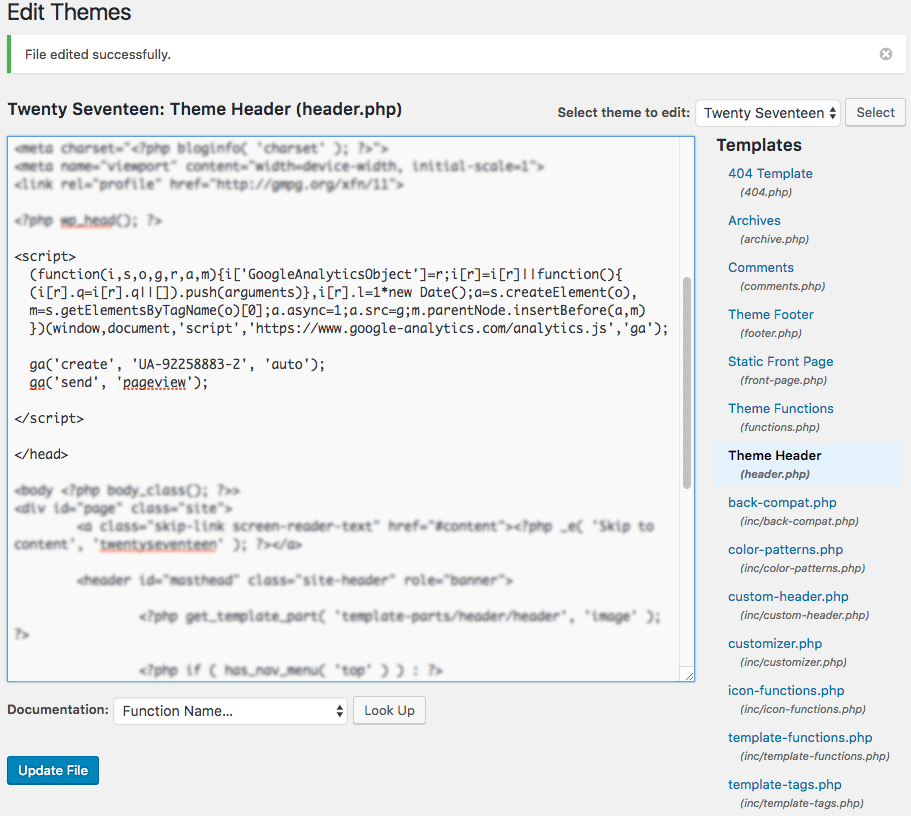
- Access the WordPress administration area and go to Appearance -> Editor.
- Open header.php for editing.
- Insert the Tracking Code Analytics code you collected in Step 1 before the </ head> tag and press the Update File button.

Note: Analytics code is only added to the current theme. You will have to insert it again if you change the theme.
Google Analytics is very important to your WordPress website, as it will help you understand your customers better. By completing this tutorial, you learned how to sign up for a Google Analytics account and three different ways to insert the Google Analytics code into your WordPress blog.
